


Floorboard repair and restoration for wooden floors
A damaged floorboard doesn’t automatically mean the whole floor needs replacing. Floorboard repair and maintenance can address localised cracks, loose boards and surface wear when the boards and the structure beneath remain sound. If water has caused swelling or weakened the timber, the moisture source needs resolving and the area drying before repairs are completed.
It’s understandable to worry that a visible fault could signal a bigger problem. With floorboard repair and maintenance, the right solution depends on what’s happening below the surface as well as what you can see. A careful assessment helps determine whether a board can be repaired or needs replacing.
This guide covers water damage, cracks, gaps, sanding and colour differences. It also explains common repair scenarios, so you can understand what may restore your floor and when more extensive work may be needed.
Table of Contents
What should I do if my wooden floor has water damage?
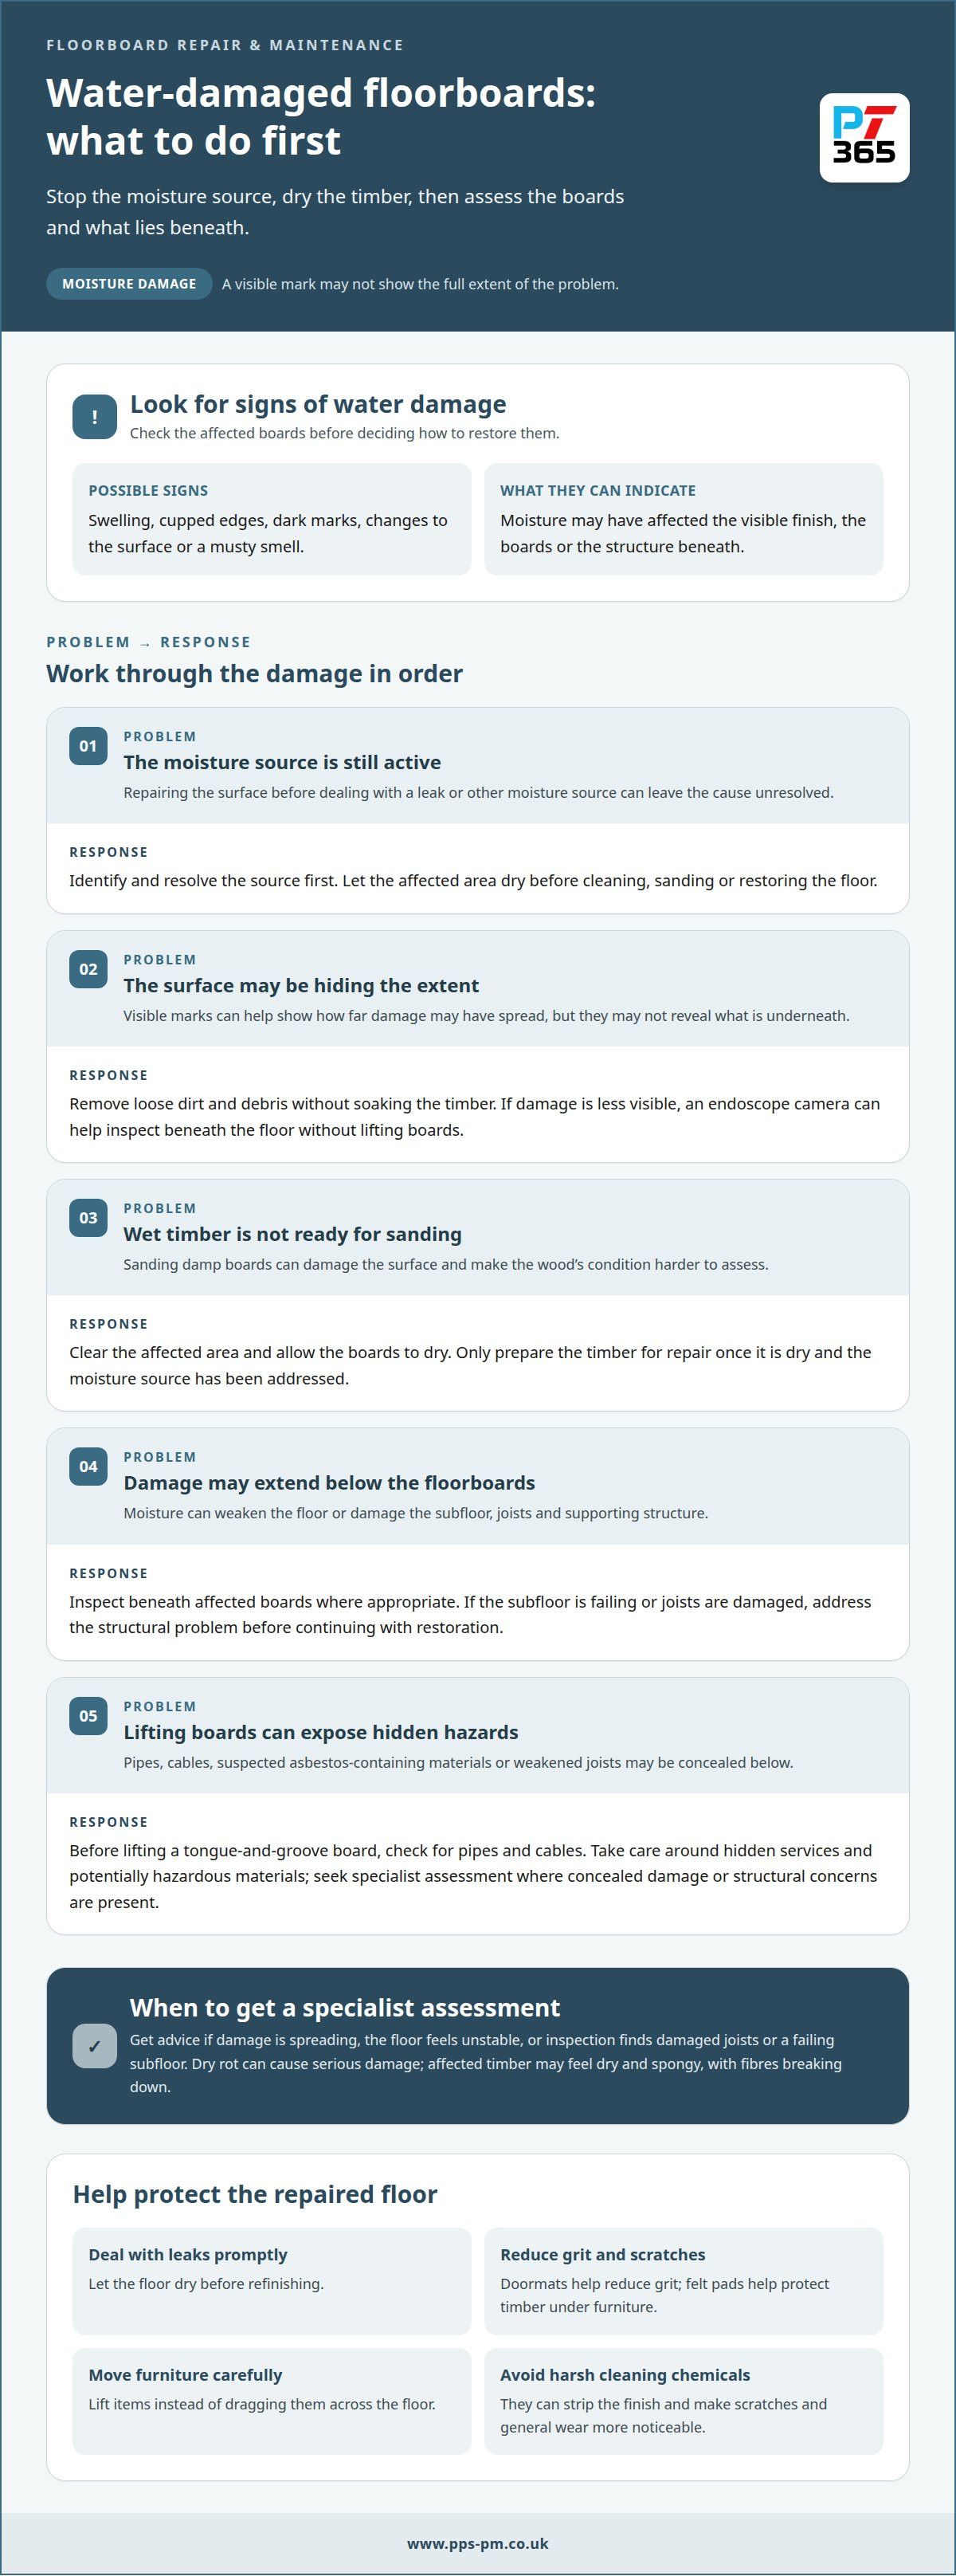
Stop the moisture source first, then assess the boards and the structure beneath them. Swelling, cupping, dark spots or a musty smell can indicate water damage. Resolve the source and let the affected area dry before restoring the floor.
Assessing and preparing water-damaged boards
Identify the leak or moisture source and have it resolved. Look for cupped edges, swelling, dark marks and changes to the board surface. These signs help show how far the damage may have spread. Before cleaning, remove loose dirt and debris without soaking the timber. Don’t sand wet boards: this can damage the surface and obscure the wood’s condition.
Clear the affected area and let the boards dry before preparing them for repair. If damage is less visible, an endoscope camera can help inspect beneath the floor without lifting boards. Where possible, choose replacement boards that match the existing timber’s species, width and thickness for a more consistent finish.
Water damage beneath the floorboards
Moisture can affect more than the visible finish. It may weaken the floor or damage the subfloor, so inspect beneath affected boards where appropriate. Before lifting a tongue-and-groove board, check for pipes and cables below it. Take care around hidden services, suspected asbestos-containing materials and weakened joists, as disturbing them can create hazards or cause further damage.
If inspection reveals damaged joists or a failing subfloor, address the structural problem before continuing with restoration. Dry rot can cause serious damage, so consider seeking professional advice. Affected timber may feel dry and spongy, with its fibres breaking down.
DIY repairs or specialist help
A small, accessible area may be suitable for careful DIY preparation once the moisture source is fixed and the timber is dry. However, lifting boards risks damaging hidden pipes or cables and disturbing potentially hazardous materials. A carpenter or flooring specialist can assess concealed damage, replace boards and address structural problems before refinishing.
Choose a repair method by considering how much flooring is affected, whether the boards remain sound and whether the subfloor needs attention. If the damaged area is spreading or the floor feels unstable, a professional assessment can help identify the next practical step.
Rules for floorboard repairs
For ordinary repairs, the work depends on whether boards are patched or replaced, or structural elements are altered. Listed buildings may have additional requirements for work affecting historic features. Permissions depend on the building and proposed work, so seek advice from the local planning authority before removing or changing original floorboards.
Preserving original timber and its finish can guide repairs to listed floors. In any property, establish the scope of work before starting, especially if the floor conceals services or damage reaches supporting structures.
To help prevent repeat damage, deal with leaks promptly and let the floor dry before refinishing. Doormats reduce grit that can scratch timber underfoot. Felt pads on furniture and lifting items instead of dragging them also help protect the surface. Avoid harsh cleaning chemicals, which can strip the finish and make scratches and general wear more noticeable.
Can broken or cracked boards be repaired?
Often, a damaged board can be repaired or replaced without renewing the whole floor. The right approach depends on whether the fault affects only the surface, the board’s fixings or the structure beneath it.
Recognising wear, movement and moisture damage
Separate surface marks from deeper faults. A minor scratch that doesn’t catch a fingernail is usually limited to the finish and may respond to gentle cleaning and a compatible maintenance product. A crack that catches or splits the timber needs closer assessment. Swelling or cupping points towards moisture, while a board that shifts underfoot may have loose fixings, worn tongues and grooves, or movement below the floor.
These signs help show whether repair should focus on the finish, the board or its support. Don’t cover a moisture-related mark before addressing its cause: the visible surface may not show the full extent of the damage.
Board thickness and repair suitability
Thickness affects how much timber remains for repair and future sanding. Original floorboards in residential properties were originally laid at a thickness of 20 mm. Pine boards approaching 15 mm are weaker and more prone to splits, cracks and damage, so removing more material may not suit them.
Assess the board’s condition and thickness. A shallow surface mark on sound timber may need only a compatible finish, while a split or weakened board may need replacing. This distinction helps prevent cosmetic treatment from being mistaken for structural repair.
Repairing loose or damaged boards in place
A loose board may need its fixing addressed, but first establish why it moves. Worn tongue-and-groove edges or movement beneath the floor can make a simple surface repair ineffective. If the board is sound, refixing it may be appropriate; a severely split or unstable board may need replacing.
For a cracked board, the method depends on the split’s depth and position. Don’t force filler into a moving gap, as natural timber movement can reopen it. Careful assessment helps protect adjoining boards and keep the repaired surface level.
Matching colour and protecting adjacent boards
Where possible, replacement boards should match the existing timber’s species, width and thickness. Colour and grade also affect how well the repair blends in. Test the proposed stain or finish in a discreet spot first, since the same product can look different on old and new timber. Parquet needs particular care to preserve its pattern and crisp edges.
Protect surrounding boards during sanding and finishing. Apply a compatible protective finish across the prepared area rather than leaving a conspicuous patch. The right approach depends on the existing coating and the extent of the repair.
In managed homes, regular inspection can help identify loose boards before they cause further disruption. Record where movement occurs and whether it changes over time. This can help distinguish a local fixing issue from a wider floor problem. A suitable repair should account for the timber, its movement and the finish, not just appearance.
Sanding, gap filling, staining and refinishing
Sanding can refresh a worn finish, but it removes timber and won’t fix every uneven or moving board. Assess the floor first, then choose between local filling, board repairs or a complete refinish.
Sanding and refinishing floorboards
Widespread wear through the old finish, or a dull and marked surface, may call for sanding and refinishing. Sanding removes some timber from pine floorboards, so the remaining thickness matters. A height difference exceeding 3 mm between boards may make sanding impractical. Parquet also needs careful work to protect its pattern and keep the edges crisp.
A smooth result depends on the correct sanding sequence, suitable finishing technique and professional-grade dust control. Work through coarse, medium and fine abrasives: 36-60 grit, then 80-100 grit, and finally 120-150 grit. Stain can alter the floor’s appearance, so assess its colour on a discreet area before applying it across the boards.
Filling and bonding cracks, gaps and holes
Choose filling or bonding according to the defect and the timber’s movement. A stable, narrow crack or small hole may take compatible wood filler, while a loose or split board needs its underlying cause addressed first. Filling alone won’t resolve structural movement. Prepare the surface, apply the material carefully and let it cure before sanding or adding a protective finish.
Deep gouges that expose raw wood may remain visible after filling, while local sanding can leave a dip or halo. Consider how the repair will look beside the original finish, not only whether the recess is covered. A small test patch helps assess colour and finish compatibility before treating a wider area.
Filling gaps in stable boards
Small seasonal gaps may suit careful filling if the boards are stable and don’t move. Timber naturally changes with conditions, so choose a filling material suited to the gap and floor. Overfilling can crack as the wood moves. Don’t pack filler into gaps that widen, narrow or sit between loose boards. Address the movement first.
For a consistent appearance, remove dust and loose debris from the gap before filling. Keep the material level with the board surface, then finish it to suit the surrounding floor. Filling every gap indiscriminately can hide the floor’s natural character and lead to cracks when the timber shifts.
Tools and materials for repairs
Floorboard repairs may need sanding equipment, abrasives, a suitable filler, stain and a compatible protective finish. A 70 by 100 mm foam sanding block can help with controlled local sanding. Choose materials for the existing timber and finish, rather than assuming one product suits every floor.
For a full refinish, dust control and an even sanding sequence matter as much as the final coat. In normal conditions, the floor can be walked on two hours after its final coat; furniture can return the following day. Follow the product’s application and curing instructions to protect the finished surface.
Examples of completed floorboard repair projects
Floor restoration depends on the damage, the timber and what lies beneath. These representative examples show how repair decisions can vary from room to room. They illustrate common approaches rather than specific customer jobs.
Localised water damage near a doorway
Imagine a leak has swollen two boards beside a doorway, leaving dark marks along their edges. First resolve the moisture source and dry the affected area, then assess the boards and supporting structure. If only those boards are damaged, replacement can be limited to that section. Matching the species, width and thickness helps the new timber sit consistently with the existing floor.
A lasting result depends on addressing the cause, not just covering the stain. Refinishing the repaired area can bring its appearance closer to the surrounding boards, although older timber may take stain differently.
Cracked boards in a well-used hallway
Imagine a hallway where one board has split and several others feel loose underfoot. Filling the crack alone would miss the movement causing the problem. First address the loose fixing or movement below, then assess whether the split board can be repaired. A weakened board may need replacing, with its grade and colour chosen to complement the floor.
Protect adjacent boards during the work, then finish the repair to suit the hallway’s existing surface. The aim is a neat transition, not a promise of a perfectly seamless match between old and new timber.
Worn finish across a living room
In a living room with dull patches and worn-through finish, spot repairs may leave visible differences. A broader restoration can involve sanding and refinishing the floor as one area. The remaining board thickness and height differences help determine whether sanding is suitable. For parquet, protect the pattern and edges throughout the process.
Stain tests help compare colours before applying the full finish. Dust control and a consistent sanding sequence support an even appearance across the room.
Seasonal gaps in a stable room
Consider a room with narrow gaps between boards that remain stable underfoot. Careful filling may suit these gaps, but filling them tightly can lead to cracks as timber moves. Focus on suitable gaps, clean preparation and a finish compatible with the floor.
Many wood floor repairs can be completed within a day, depending on the area and damage. The practical takeaway is simple: assess movement, moisture and timber condition before choosing a repair. This helps prevent cosmetic work from masking a problem that needs a more substantial solution.
How to repair floorboards without removing them
Some floorboard faults can be addressed in place, especially surface marks and loose fixings. First distinguish cosmetic damage from a split or unstable board, or movement beneath the floor. Before disturbing fixings, locate pipes and cables below the boards. Cutting or drilling without checking can damage hidden services and create a larger repair.
For light scratches that don’t catch a fingernail, clean the surface gently and use a maintenance product compatible with the existing finish. Avoid aggressive sanding on a small patch, as it can leave a visible dip or halo. Deep gouges that expose raw wood may not respond adequately to filler alone. Assess the damaged area and surrounding finish before choosing a repair method.
A loose board may be secured in place if the board remains sound and the cause is accessible. Identify whether movement comes from a failed fixing, worn tongue and groove, or movement beneath the floor. Fixing only the visible board won’t resolve movement below it. If replacement is needed, use suitable fixings to secure the board. Alternatively, use 50 mm countersunk screws in 4 mm or 5 mm gauge.
Pilot holes can help prevent a replacement board splitting when nails are driven in. Position fixings to hold the board securely without raising its edge or damaging neighbouring timber. Match the replacement’s species, width, thickness, colour and grade as closely as possible. On parquet, preserve the pattern and protect its edges while working.
Small, stable gaps may be filled, but gaps that change as boards move need a different approach. Overfilling can crack as the timber shifts. Wood filler may also fail to disguise a deep gouge, while local sanding can leave a visible mark. Choose the repair method to suit the defect rather than applying the same treatment to every surface.
Allow repair products to cure fully before walking on the floor. Most resins and oils typically need 24 hours before the repaired area is used. Follow the product’s curing instructions, since early use can mark or disturb the finish. Many wood floor repairs can be completed within a day, depending on the affected area and damage, but curing time remains a separate step.
A board split through, an unstable section or suspected structural damage may not suit an in-place patch. The repair depends on the board’s condition, the cause of movement and access beneath the floor. Careful assessment helps determine whether refixing, local treatment or replacement is the soundest next step.
We are a trusted Property Maintenance company providing reliable, high-quality services across London and Kent
Plumbfix 365 helps homeowners, letting agents and property managers address floorboard concerns through its property maintenance services. If boards are cracked, loose or marked by moisture, a practical assessment can help distinguish surface wear from damage that needs more attention. The findings guide the next step, whether that means arranging a local repair or considering wider property work.
For floorboard repair and maintenance, understand the cause before choosing a finish or filling gaps. This matters especially where moisture or movement may affect the floor beneath the visible boards. Clear information about the affected room and damage helps explain the issue and the work involved.
Contact Plumbfix 365 to discuss your floorboard concerns and property maintenance needs.
Choose the next step for your floor
Before deciding on a repair, consider how you want the floor to serve the room over time. A carefully planned repair can retain original timber and character, while the right finish can sit comfortably alongside the rest of your home. Match the work to the boards’ condition rather than treating every mark or gap alike.
Good floorboard repair and maintenance means thinking beyond appearance. If the floor feels unstable or the damage keeps returning, address the underlying cause before cosmetic work. This helps you make a practical decision for your home, rental property or managed building.
For support with property maintenance across London and Kent, contact our London and Kent property maintenance team to discuss the issue and possible next steps. A clear assessment can help you move forward with confidence and protect the floor’s useful life.
Frequently Asked Questions
When can floorboards be repaired?
Floorboards can often be repaired when the damage is local and the surrounding timber remains sound. A shallow mark, isolated crack or loose fixing may need less work than a board split through its length. Check whether the floor feels firm around the affected spot. If damage returns after repair or several boards move together, the cause may extend beyond the visible surface and needs assessment.
Can scratches and dents in wooden floors be fixed?
Yes. Light scratches may improve with gentle cleaning and a maintenance product compatible with the floor’s finish. Treatment can sometimes make a dent less noticeable, but deep gouges that expose raw timber may need a broader repair. Test any finish in a discreet place first to see whether its colour and sheen suit the surrounding boards.
Got loose, creaky or damaged floorboards?
Loose or creaky boards often point to movement at a fixing, a worn joint or support beneath the floor. Note where the sound occurs and whether it happens when weight shifts across a particular board. One loose board differs from movement across a wider area. If the floor suddenly becomes unstable or the sound follows a leak, prioritise assessment over cosmetic filling.
How can I identify the type of floorboards and common causes of damage?
Look at an exposed edge beside a threshold or radiator pipe without lifting the board. Solid timber shows wood through its thickness, while engineered flooring has a layered construction. Board width, grain and joint shape can also help identify the floor. Common causes of damage include moisture, wear, loose fixings and repeated impact, such as a heavy object falling in one spot.
How do I repair loose, squeaky or cracked floorboards step by step?
First locate the affected board and identify whether it moves, squeaks or has a visible split. Check for nearby services before disturbing fixings. Then establish whether movement comes from the board or its support: a surface patch won’t correct movement underneath. Refixing suits a sound board with a fixing issue. A split or weakened board may need a different repair.
How do I replace a damaged floorboard safely?
Before lifting a board, establish the direction of any pipes or cables beneath it and don’t cut blindly into the floor. Tongue-and-groove boards can be difficult to remove without affecting their neighbours, so careful access matters. Match the replacement’s dimensions and timber as closely as possible. If the floor conceals services or structural damage, arrange a skilled assessment before disturbing it.
How do I sand, fill and refinish wooden floorboards?
Start with a sound, clean floor and choose a repair material compatible with the existing finish. Sand progressively rather than jumping straight to a fine abrasive, then remove dust before applying stain or a protective coat. Test the colour on an inconspicuous patch first. Local sanding can leave a visible outline, so a wider blend may be needed for an even appearance.
How should I maintain floorboards, and how often should I clean or reseal them?
Use a cleaning method suited to the floor’s finish and avoid leaving standing water on the timber. Sweep or vacuum grit before it scratches the surface, and use furniture pads to limit scuffs. How often to reseal depends on finish type, foot traffic and visible wear, so follow the product’s care instructions. Renew protection when the finish becomes worn, rather than coating over dirt or damage.

Comments