

Floor Joist Repair Maintenance: Examples of Access, Repairs and Prevention
A soft or sagging floor does not automatically mean every joist needs replacing. Careful floor joist repair and maintenance starts with assessing how far the damage has spread and whether the timber can be repaired or needs replacement.
If you have noticed uneven boards, a damp smell or signs of rot, it is reasonable to want a clear explanation before work begins. The right floor joist repair depends on the timber’s condition, the location of the damage and how the affected area can be accessed.
This guide explains how professionals assess damaged joists, compare access and repair options, and identify rotten joist ends. It also covers ways to reduce future moisture ingress, so you can understand the work involved and what to discuss before choosing a repair.
Table of Contents
Repair access options and installation types
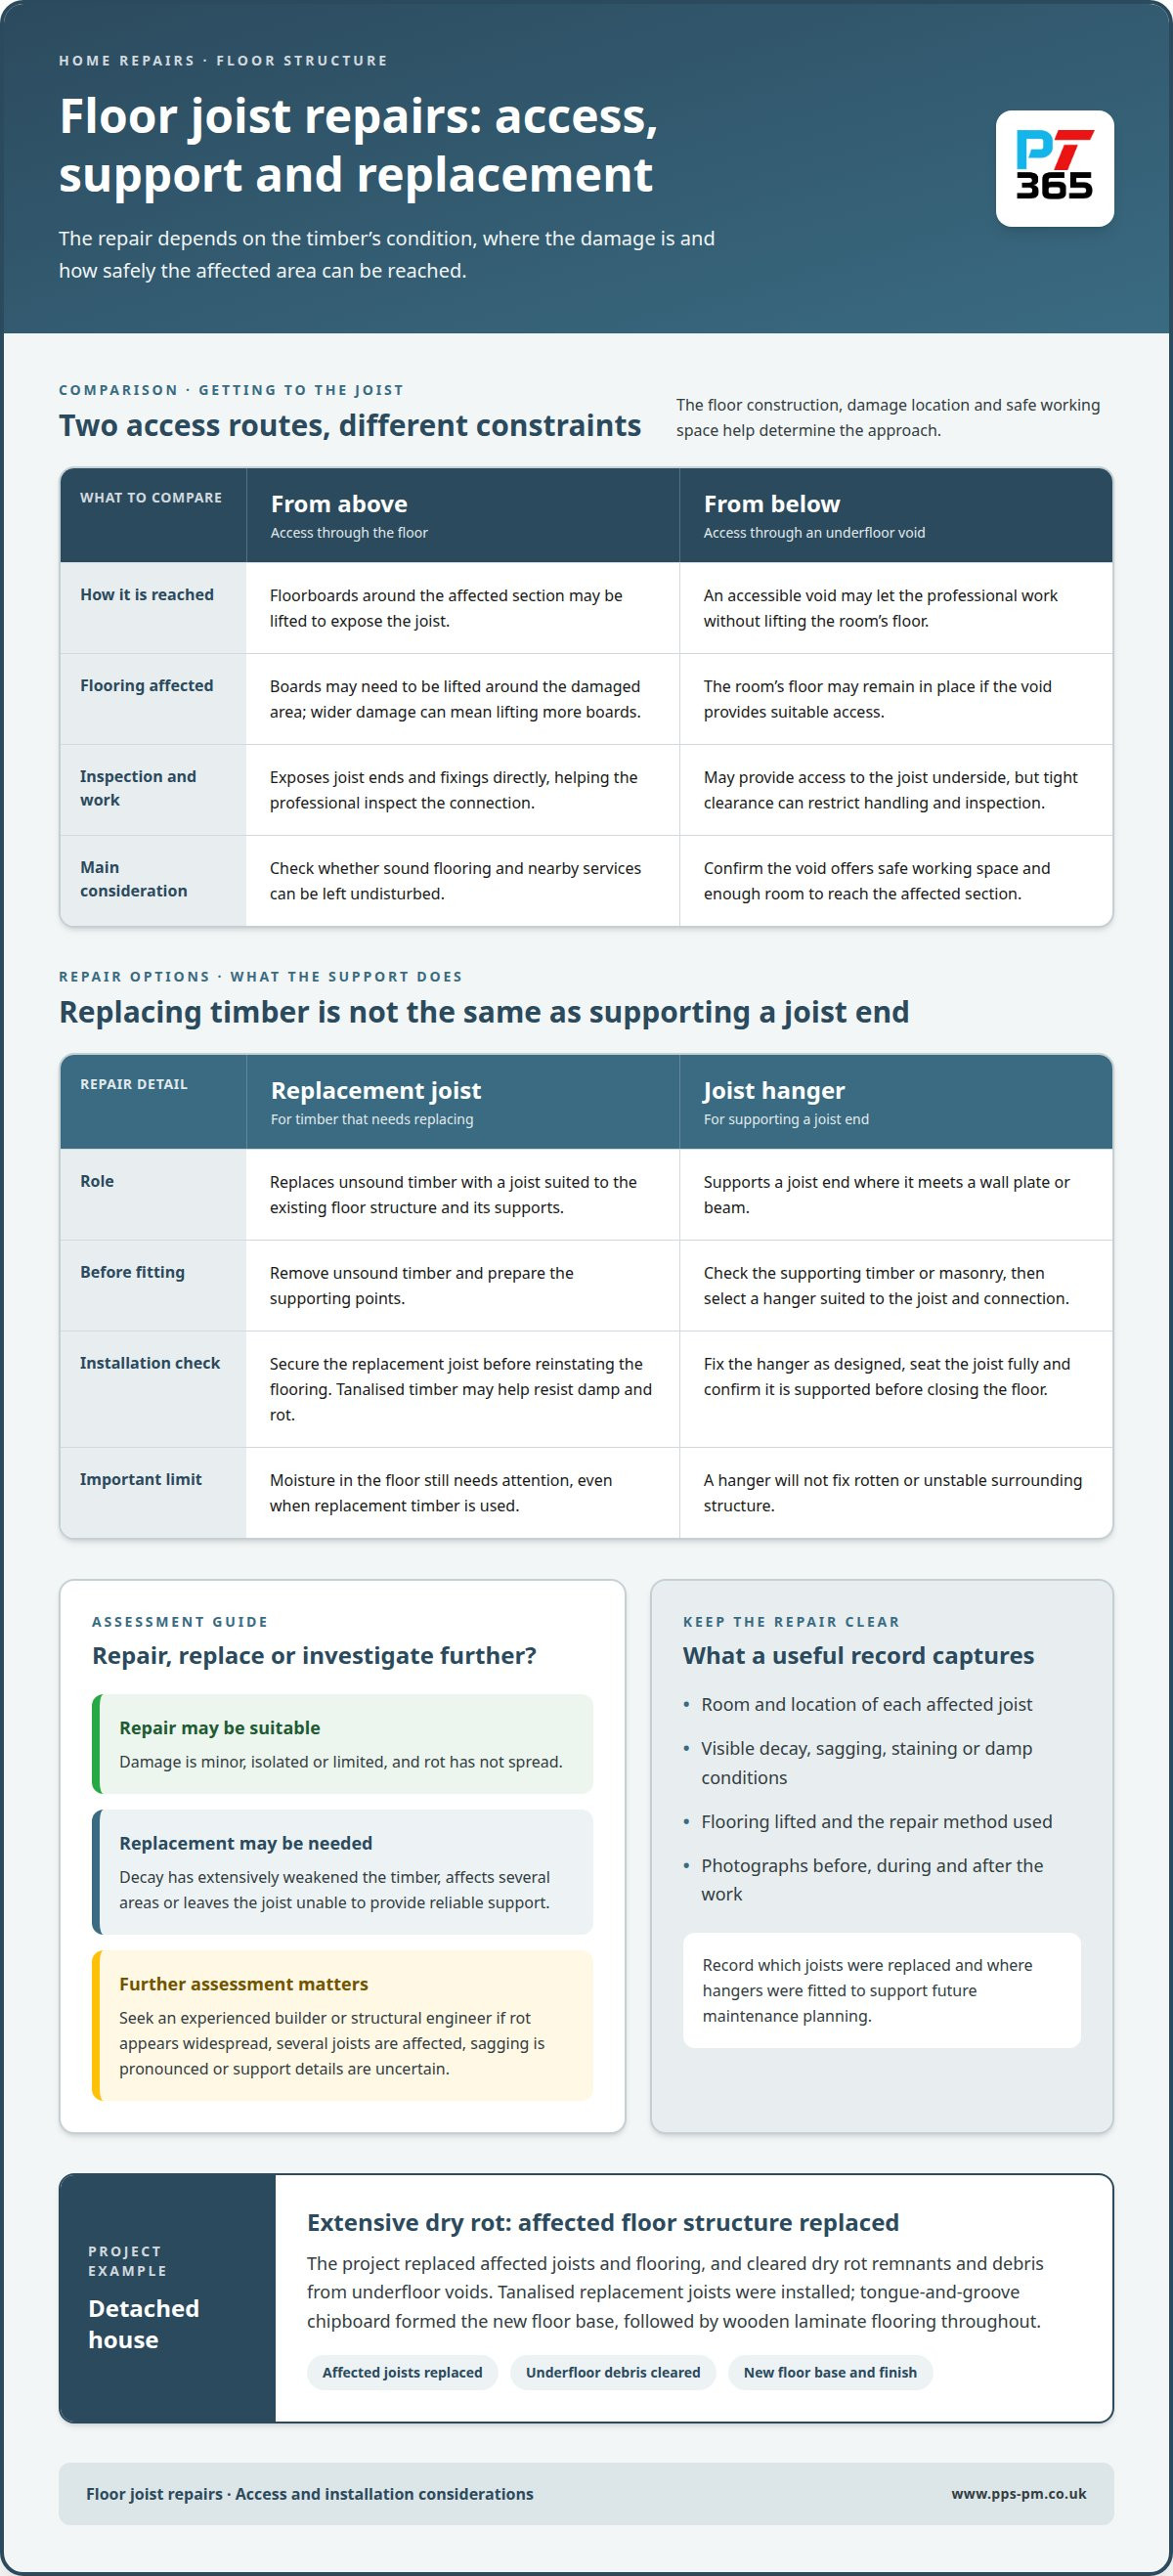
Access determines how a damaged joist can be reached and whether surrounding flooring needs to be lifted. From above, a professional may remove floorboards around the affected section. From below, an accessible underfloor void may allow work without lifting the room’s floor. The best approach depends on the floor construction, the damage location and whether there is safe working space.
Before fitting a replacement, the professional identifies the joist ends and the structure supporting them. They check whether the timber can be exposed without disturbing sound flooring or nearby services. Restricted access can make a local repair impractical, while wider damage may require more floorboards to be lifted. A clear work area also makes it easier to remove damaged material and debris.
Tanalised replacement joists
Replacement timber must suit the existing floor structure and its supports. Tanalised timber may help resist damp and rot, while moisture in the floor still needs attention. The professional removes unsound timber, prepares the supporting points and secures the replacement joist before reinstating the flooring.
Detached-house example: A ground-floor property had extensive dry rot affecting its joists and flooring. The project replaced the affected joists and floor, and cleared dry rot remnants and debris from underfloor voids. Tanalised replacement joists were installed to improve resistance to damp and rot. Tongue-and-groove chipboard formed the new floor base, followed by wooden laminate flooring throughout.
Joist hangers
A joist hanger supports a joist end where it meets a wall plate or beam. The professional first checks the supporting timber or masonry, then selects a hanger suited to the joist and connection. They position and fix it as designed, seat the joist fully, and confirm it is supported before closing the floor. A hanger can provide a practical connection when a joist end needs support, but it will not fix rotten or unstable surrounding structure.
Access affects the installation sequence. With boards lifted from above, the professional can expose the joist ends and fixings directly. From an underfloor void, they may reach the joist underside, but tight clearance can restrict handling and inspection. For landlords, recording which boards were lifted, which joists were replaced and where hangers were fitted helps keep repair information clear for future maintenance.
Planning floor work alongside wider property upkeep can help organise inspections and repair records. Joist access and installation still need to be planned around the floor’s construction and the condition of its supports.
Surveying damaged joists and recording repair requirements
Minor sagging, isolated damage or limited rot that has not spread may be suitable for repair. Replacement is more appropriate when decay has extensively weakened the timber, affects several areas or leaves the joist unable to provide reliable support. An assessment should establish the condition of both the timber and the surrounding structure.
A professional survey starts by recording visible floor defects, such as uneven boards, staining, soft timber and signs of moisture. The inspection follows each affected joist towards its supports to determine whether the damage is local or continues along the timber. Floorboards may need to be lifted to check concealed sections. The findings should distinguish observed damage from areas that remain hidden.
Clear records help define the repair scope. A survey note can identify the room, affected joist locations, visible decay, flooring removed, likely repair method and any follow-up investigation. Photographs taken before, during and after work show what was exposed and replaced. For a landlord or managing agent, a dated record also supports maintenance planning and communication with occupants.
Map the affected area: record the room and the location of each damaged joist.
Describe the evidence: note sagging, rot, staining, loose flooring or damp conditions.
Define the work: record whether repair, replacement or further structural assessment is needed.
Document completion: photograph the exposed structure and finished repair.
Remove damaged flooring and timber in a controlled sequence. The professional isolates the work area, lifts only the boards needed for access and separates unsound material from timber being retained. Waste is cleared from the work area and disposed of appropriately. If joist ends are affected, they cut back only to sound timber, keeping the cut clear of the supporting wall or beam and preserving the surrounding structure.
Whether floor joist repairs need building regulations approval depends on the proposed work. Ask local building control to consider the scope, particularly if structural members are being replaced or altered.
A structural engineer or experienced builder should assess damage if rot appears widespread, several joists are affected, the floor has pronounced sagging or support details are uncertain. Their assessment can help establish whether the proposed repair can safely carry the floor’s loads.
There’s no single repair scope for every UK floor: the work depends on damage extent, access, and whether boards or joists need replacement. DIY repairs risk leaving hidden decay in place, weakening supports, or cutting sound timber. Professional home repairs can include a documented inspection and a repair plan based on the exposed structure.
Specialist tools and repair procedures
Professionals match tools to the defect and the repair design. A reversible electric drilling machine rated at least 1,000 watts is specified for cutting slots or drilling joist ends. Its direction can be changed where the method or access requires it. The professional controls each cut to avoid damaging sound timber or nearby structure.
For a resin splice, the repair design sets the cut geometry and joint position. A Type C45 timber resin splice has a 45-degree face angle. The professional removes unsound material, prepares the timber faces and fits the splice to the specified detail. Accurate alignment matters. A poorly matched joint can leave gaps or place the repair out of position.
Epoxy grout may be injected into prepared side slots using a 1-litre skeleton gun. Before application, the professional checks that the slots and surrounding timber suit the repair. They then allow the materials to reach the required condition before loading or enclosing the joist. Product instructions and the structural design govern that sequence.
Before cutting: identify the repair boundary and protect nearby surfaces and services.
During preparation: remove unsound timber and keep repair surfaces clean.
At installation: position the splice or reinforcement to match the repair design.
Before closing the floor: inspect the joint and record the completed work.
Consider a joist with localised decay and sound timber beyond the damaged area. The professional confirms that the remaining section can support the planned splice, then follows the specified cutting method, prepares the joint and installs the designed repair. This creates a localised repair rather than a patch fixed over decayed material.
A joist requiring a side-slot repair presents a different situation. The professional prepares a slot suited to the repair and uses a skeleton gun to place epoxy grout. They then check the finished work against its design before closing the floor. The procedure is tailored to the exposed timber and specified repair.
Tool choice alone cannot establish whether a repair is suitable. The design must account for damage, joist dimensions, support points and access. A 1,000-watt drill or resin gun cannot compensate for weakened timber left beyond the repair area. Photographs and job records should show the defect, materials used and completed connection.
Effective floor joist repair maintenance brings together assessment, preparation, installation and inspection. A written scope should identify the repair location, method and timber to be retained. This clarifies the work and supports future maintenance. The repair method should reflect the condition of the exposed structure, not simply the tools available.
Preventing future moisture ingress
Floor joist rot usually follows persistent damp. Sagging, cracking or movement can result from weakened timber or failing supports. Leaks, damp masonry and moisture trapped beneath a floor can keep timber wet. Repairing joists without addressing the moisture source risks further deterioration around new or retained timber.
Before closing the floor, professionals trace the damp. They inspect exposed joists, wall bearings, sleeper walls and nearby pipework for signs of water entry. They distinguish active leaks from residual staining and include relevant action in the repair plan. If a leak has affected floorboards or surrounding finishes, the inspection also identifies which materials need attention.
Project example: A ground-floor property had dry rot, with sleeper walls and brickwork exposed. The team treated those masonry areas with damp seal to help prevent future moisture ingress. This addressed the surrounding surfaces as well as the replacement floor, reducing the risk of leaving a known moisture pathway untreated.
A moisture-control plan links each finding to a practical action. For example, a damp joist beside pipework calls for attention to the plumbing before the floor is sealed. Damp masonry beside a joist end calls for examination of the junction and surrounding wall. The professional records the location, identified source, completed work and any areas needing continued observation.
Trace the source: inspect pipework, masonry and the underfloor area around affected timber.
Address the cause: include relevant source repairs before reinstating flooring.
Protect exposed structure: treat suitable masonry where assessment identifies a moisture pathway.
Keep a record: photograph the area and document the completed measures.
After repairs, preventative maintenance can help identify renewed damp before it damages more timber. A planned inspection can look for fresh staining, musty smells, changes in floor level and moisture around previously affected joists. For a landlord or managing agent, recording these observations alongside repair details makes changes easier to track between inspections.
Prevention must suit the building. Applying a coating without addressing a leak or damp source can conceal symptoms rather than resolve them. Replacing a joist alone will not protect neighbouring timber if moisture continues entering through the same area. Survey findings should guide each measure, and affected areas should remain accessible for inspection where practicable.
Effective floor joist repair maintenance addresses both the timber and the conditions exposing it to moisture. A professional plan should record the cause, remedial action and areas requiring ongoing attention. This gives owners a practical basis for planned upkeep and helps prevent warning signs from being overlooked. Consistent floor joist repair maintenance can also help identify renewed damp before it leads to wider damage.
Recognising rotten joist ends
Joist ends deserve close attention because they often meet masonry, where moisture can affect the timber. A rotten end may look dark, feel soft, split along the grain or crumble at the surface. The floor above may also feel springy or uneven if the timber no longer provides firm support.
These signs indicate a possible problem, but the visible surface does not reveal the full extent of decay. A professional inspects the joist end, its bearing point and nearby masonry together, looking for staining, damaged timber and signs of damp around the wall junction. The assessment should establish whether decay is local or extends along the joist.
Soft or crumbling timber: indicates that the affected end has lost strength.
Dark staining or persistent damp: points to moisture around the bearing or adjoining masonry.
Splits or a distorted end: can show deterioration where the joist should rest securely.
Movement in the floor: may indicate weakened support beneath the affected area.
Access matters. A joist end concealed beneath floorboards or behind a wall finish cannot be properly assessed from the room’s surface alone. The professional exposes the relevant area and checks the timber where it meets the support. They record its position and visible condition, then compare it with adjacent joists and the surrounding floor structure.
Dry rot can weaken timber joists and flooring, and may also affect brickwork. This makes the wall around a rotten end important to assess. The professional looks for decay beyond the timber, considers how moisture may have reached the junction and records whether nearby masonry needs attention. Replacing timber without addressing affected surroundings can leave damage unexamined.
For example, a floor feels uneven near an external wall, and an inspection reveals a dark, soft joist end. The professional traces the damage towards sound timber and examines the adjoining masonry. If decay is confined, the repair scope can focus on that area and its cause. If damage continues beyond the exposed end, the scope must cover the wider affected section.
Good records distinguish what was visible before work from what became apparent after access. A repair record should identify the room, joist position, condition of the end, related moisture signs and action taken. Photographs of the exposed bearing help landlords and property managers understand the repair and monitor the area during future inspections.
Don’t treat a soft joist end as a cosmetic flooring issue. An assessment should establish the extent of decay, the condition of its support and whether moisture remains present. For a clear professional inspection and repair plan, arrange a property repair assessment.
We are a trusted Property Maintenance company providing reliable, high-quality services across London and Kent: Home Repairs
We are a trusted Property Maintenance company providing reliable, high-quality services across London and Kent providing Home Repairs for property owners, letting agents and management companies managing floor damage. When joists show signs of rot, movement or moisture, a clear repair scope helps establish what needs attention and how the work fits into wider property upkeep.
Our Property Maintenance Services can support ongoing repair planning, and a Handyman can help with suitable general maintenance tasks around the property. If you have concerns about joists, share the signs you’ve noticed and any inspection records or photographs. This helps clarify the issue and the next step.
If floor damage needs professional attention, contact We are a trusted Property Maintenance company providing reliable, high-quality services across London and Kent to discuss your home repair requirements.
Plan the next step for your property
Use the inspection findings to decide what needs attention now and what to monitor. A clear record of the affected area, repair scope and moisture concerns gives you a practical basis for discussing the work, whether you manage your own home or oversee a rental property.
Plumbfix 365 offers Home Repairs and Property Maintenance Services for property owners and managers. Its Handyman service can also support suitable general maintenance tasks. For joist concerns, share the symptoms and any existing inspection records so the discussion can focus on the condition of your floor and the next steps.
Good floor joist repair and maintenance is about making an informed decision before damage spreads or the floor is closed up. If you need help planning property repairs, contact Plumbfix 365 to discuss your requirements. A clear starting point can make the next decision feel more manageable.
Frequently Asked Questions
What are the signs of damaged or failing floor joists?
Warning signs include a floor that feels bouncy, slopes or moves underfoot, as well as cracked or loose floorboards. A sticking door near an affected room may also prompt closer inspection, although it does not prove joist failure. Damp smells, staining or visible timber decay add concern, especially near walls. A professional assesses these clues together because floor movement can have causes beyond the joists themselves.
How do professionals inspect floor joists safely in a UK home?
Professionals first assess the floor, access route and visible signs of damage before exposing any timber. They plan how to lift flooring without disturbing nearby services or sound structure, and consider how the floor will remain supported during the work. Once accessible, they inspect joists, bearings and surrounding masonry, then record findings and photographs. This makes the repair scope clearer and helps identify areas requiring further structural assessment.
How do professionals repair a damaged floor joist, including sistering and splicing?
The method depends on where damage ends and how much sound timber remains. Sistering fixes a new timber alongside an existing joist, while a splice replaces or reinforces a defined damaged section. A resin splice may use matching prepared faces, with a Type C45 splice having a 45-degree face angle. The professional selects and installs the method to suit the exposed joist and its supports.
What materials and specialist tools do professionals use to repair floor joists?
Materials can include replacement timber, joist hangers, fixings and, for designed repairs, timber resin or epoxy grout. Tanalised timber may be chosen for replacement joists to improve resistance to damp and rot. A reversible electric drilling machine rated at least 1,000 watts is specified for cutting slots or drilling joist ends. Tool and material choices depend on access, timber condition and the repair design.
How can professionals prevent damp, woodworm and future joist damage?
Professionals look for moisture sources around joists, such as damp masonry or nearby leaks, and include relevant remedial work in the repair scope. They can treat suitable masonry with damp seal when the project identifies a moisture pathway. Woodworm requires separate assessment: the professional checks the affected timber and determines whether treatment is appropriate. Follow-up inspections and recorded findings help track renewed damp or changes in the floor structure.



Comments