


How to Cover Water Stains on a Ceiling with the Right Blocker
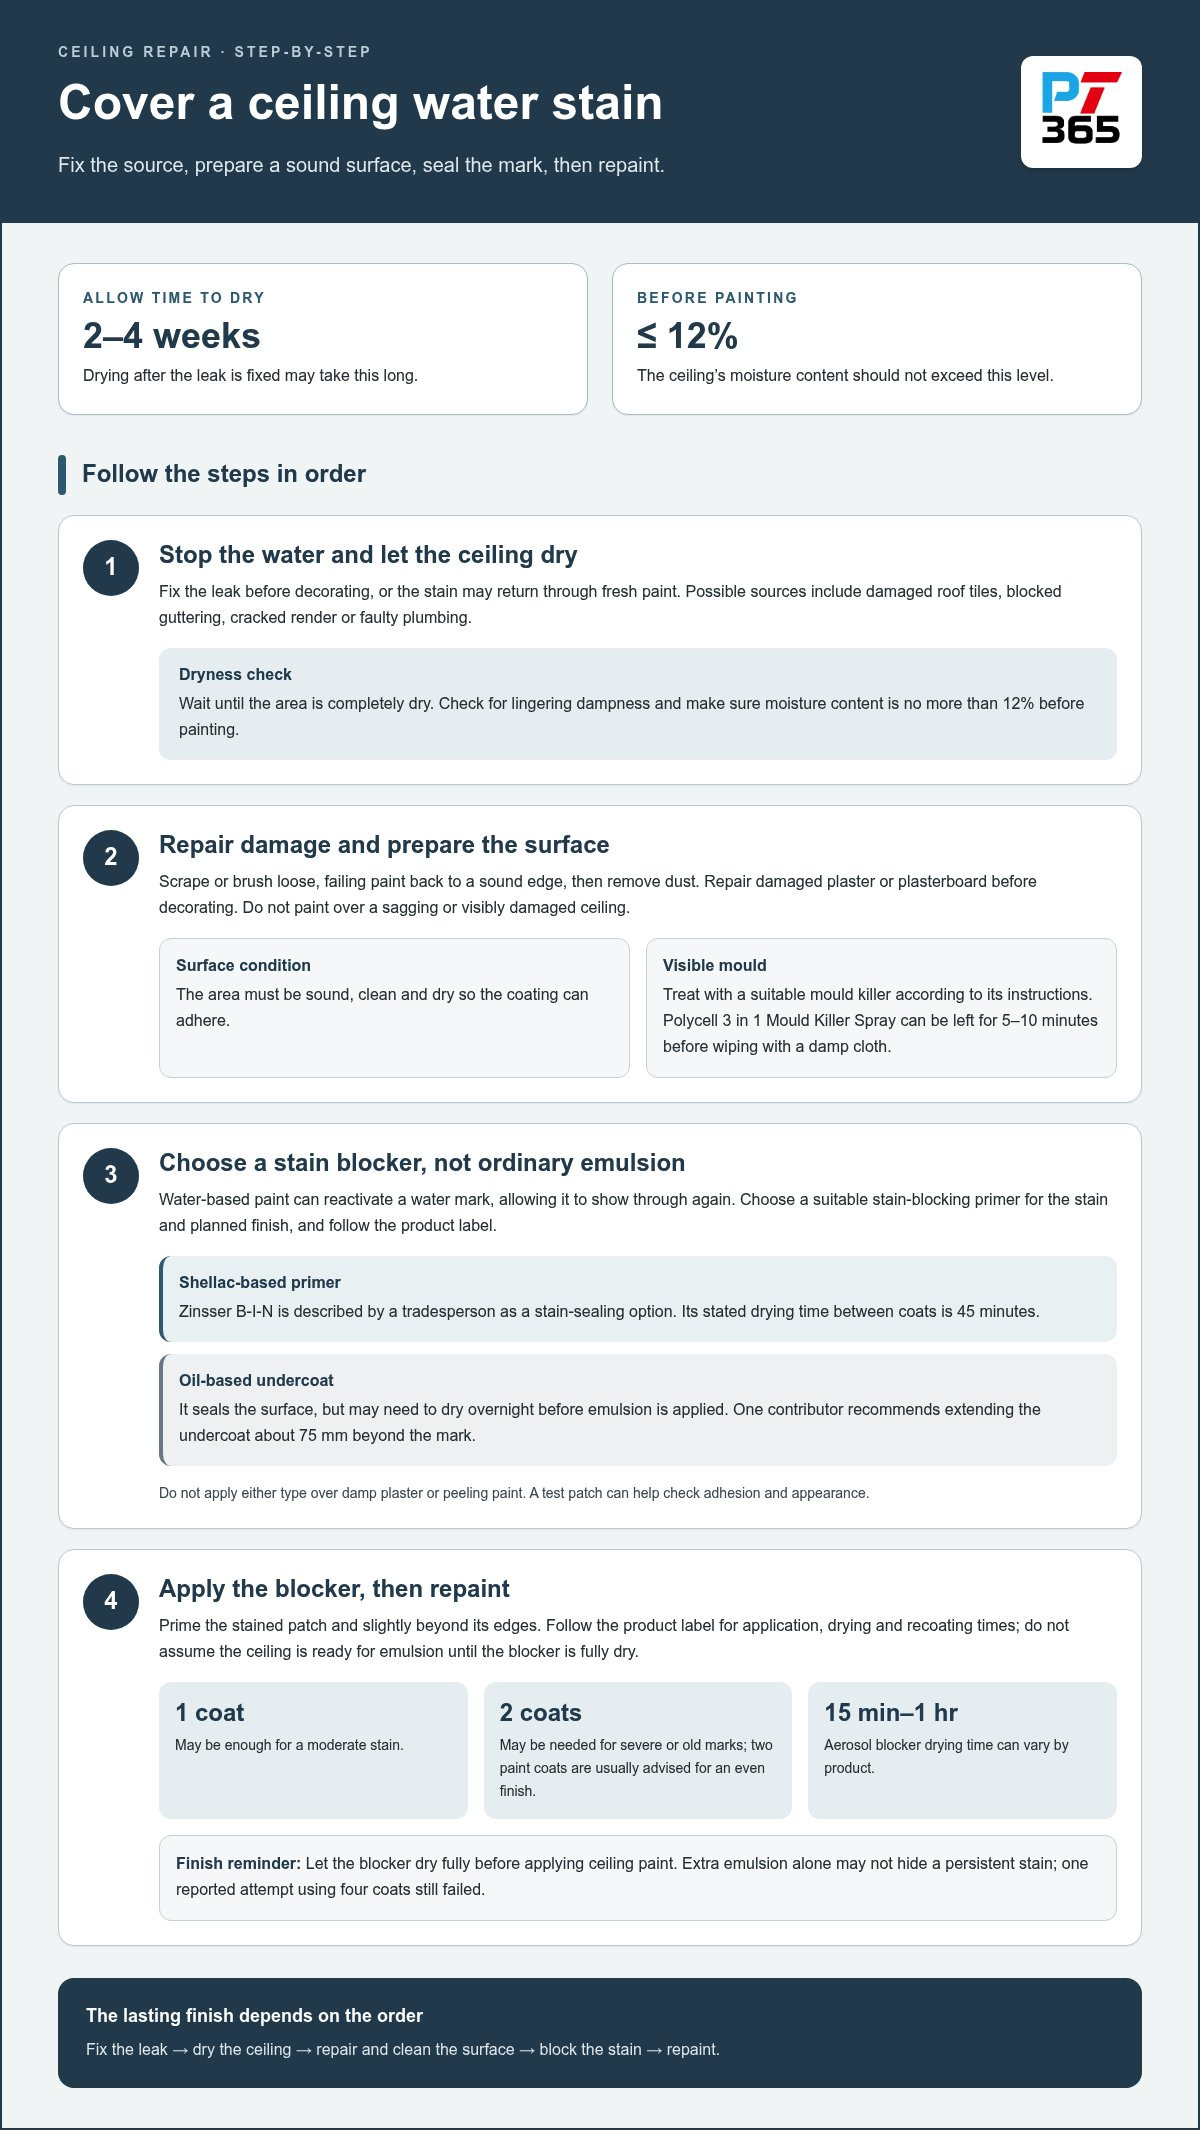
Painting over a ceiling water stain before fixing its source can let the mark show through again. For covering water stains on a ceiling, first deal with the leak, then let the area dry completely, clean it and apply a suitable stain blocker before repainting. Drying can take 2-4 weeks, and the surface’s moisture content should not exceed 12% before you paint.
It’s frustrating when a brown mark spoils a freshly painted room, but it may signal water ingress rather than a surface blemish. Damaged roof tiles, blocked guttering, cracked render or faulty plumbing can all cause ceiling stains. Finding and fixing the source matters as much as choosing the paint.
This guide explains how to prepare a ceiling, clean water marks and treat visible mould. You’ll also learn when a shellac-based blocker may suit the job and how it compares with an oil-based option. Work through the steps in order to help the repair last and leave the ceiling ready for an even finish.
Table of Contents
What about covering water stains on ceilings?
Fix the leak first, then let the ceiling dry fully before applying stain blocker. After a leak is fixed, drying may take 2-4 weeks.
To see how ceiling paint is applied, watch this practical demonstration:
Fix leaks and check the ceiling is dryStop the water entering before decorating, or the mark may return through fresh paint. Water ingress can come from damaged roof tiles, blocked guttering, cracked render or faulty plumbing. Let the repaired area dry completely; before painting, its moisture content should not exceed 12%. Check for lingering dampness and clean the surface only once the leak is remedied.
Repair damage and prepare the surfaceScrape or brush loose, failing paint back to a sound edge, then remove dust and anything that could weaken adhesion. Don’t paint over a sagging or visibly damaged ceiling. The affected plasterboard or plaster needs repair before decorating, and the surface must be clean and dry. Treat visible organic growth with Zinsser Mould Killer according to its instructions, then let it dry. Alternatively, leave Polycell 3 in 1 Mould Killer Spray on for 5-10 minutes before wiping with a damp cloth.
Choose paint and stain-blocking primerChoose a stain blocker rather than relying on ordinary emulsion: water-based paint can reactivate a stain, allowing it to show through again. Apply primer to the stained area and slightly beyond its edges; one contributor recommends extending oil-based undercoat about 75 mm beyond the mark. For walls or ceilings, use paint intended for that surface and follow its label. Washable or mould-inhibiting paint can suit rooms where cleaning or damp-related concerns matter, but it won’t replace treating mould or fixing water ingress.
Apply primer and ceiling paintFollow the product label for drying and recoating times. Zinsser B-I-N takes 45 minutes to dry between coats; aerosol stain blockers can take 15 minutes to an hour, depending on the product. Moderate stains usually need one blocker coat, whilst severe or old marks may need two. Let the blocker dry fully, then apply ceiling paint; two coats are usually advised for an even finish. A contributor found four emulsion coats alone still failed to hide a stain.
Repair a water-damaged or sagging ceiling before priming or repainting. Painting over weakened material may hide the damage briefly, but it won’t restore the surface. Start decorating only once the repair is sound, clean and dry.
Choosing between shellac-based and oil-based stain blockers
Match the blocker to the stain and planned finish. Water-based emulsion can reactivate a water mark, allowing it to show through again. Oil-based undercoat seals the surface, and two coats may be needed to block a stain. White undercoat can also work, although several coats may be required. Allow for drying time: an oil-based layer may need to dry overnight before you apply emulsion.Read the product label before choosing a blocker. The surface condition, stain severity and intended topcoat all affect preparation. Don’t apply either type over damp plaster or peeling paint. A sound, dry surface helps the coating form an even barrier without trapping loose material underneath.
Choose shellac-based primer when you need a dedicated stain-sealing layer. A tradesperson recommends Zinsser B-I-N, describing its shellac base as preventing stains from coming through. It takes 45 minutes to dry between coats. That makes the stated recoat interval clear, but it doesn’t remove the need to follow the tin’s instructions for application and final drying.Apply shellac to the stained patch rather than coating the entire ceiling unnecessarily. Extend it just beyond the mark to seal the visible edge. A test patch can show whether the primer adheres and how it looks under the planned finish. Ventilate the room as directed on the product label.
Compare the two systems by their drying and recoating requirements, not just their names. Oil-based undercoat may suit a repair where overnight drying fits the work schedule. Zinsser B-I-N specifies 45 minutes between coats. Neither interval means the ceiling is ready for emulsion automatically; the blocker must be dry according to its instructions first.Choose the number of coats based on the stain. A moderate mark may need one coat of blocker, while a severe or old stain may need two. If an oil-based layer doesn’t hide the mark, another coat may be needed. Don’t try to cover a persistent stain with extra emulsion alone: one reported attempt used four coats and still failed.
Plan the topcoat around the blocker. When the sealing coat is fully dry, apply ceiling paint evenly over the treated area. Two coats of paint are usually advised after the blocker dries. A clear blocker may leave the old ceiling colour visible, while a white opacifier can reduce the number of paint coats needed for an even finish.Consider how the repair will look against the surrounding ceiling. Even when the stain no longer bleeds through, a small sealed patch can appear different. Use the same ceiling paint across the area to blend the finish. If the water damage also needs repair, address that work as part of your decorating plan.
Cleaning water stains and treating mould
Once the leak is fixed, clean the affected area and treat visible mould before decorating. Work in order so dirt, dampness or cleaning residue won’t interfere with the paint.
Check health and safety risksAssess the ceiling before cleaning, and don’t disturb material that is sagging or unstable. Check whether the surface is damp and whether mould or damaged paint could fall during the work. If the ceiling appears compromised, stop rather than leaning or pressing against it.Consider the air as well as the surface. The NHS explains that microbes in damp homes can produce allergens, toxins and volatile compounds that irritate the airways of sensitive people. Keep sensitive occupants away from the room while you clean, and follow the cleaner’s label for application and precautions.Before starting, gather the cleaner, a damp cloth and a safe way to reach the area. Protect nearby belongings from splashes and keep the work area clear. Address the water source first; otherwise, new moisture can undermine cleaning and cause the stain or mould to return.Read the product instructions before opening or applying a mould treatment. Use only the method stated on the label, and don’t mix or improvise with cleaning products. If loose ceiling material makes the area unsafe, wait until the damaged surface has been made safe before cleaning.
Clean stains and treat mouldStart after the leak has been fixed. Clean water-stained areas because damp conditions can lead to mould. Gently remove surface dirt with a damp cloth, taking care not to soak the ceiling. Let the patch dry before applying primer or paint.For visible organic growth, apply Zinsser Mould Killer according to the manufacturer’s instructions and allow it to dry. Follow the label for how to apply it and how long to leave it. Treat the affected area evenly, including the edges where growth is visible.Polycell 3 in 1 Mould Killer Spray is another named option. Leave it on for 5-10 minutes, then wipe it away with a damp cloth. Keep to that stated contact time and wiping method. Don’t paint over wet cleaner or remaining residue; allow the treated surface to dry first.Inspect the patch after cleaning. If mould remains visible, repeat the treatment only as the product instructions allow. Keep cleaning and painting separate: the surface must be clean, dry and free from anything that could affect paint adhesion. Once dry, the ceiling is ready for the next preparation step.
Common causes and appearance of ceiling water stains
Before planning a repair, trace the likely route of the water. The stain’s position and pattern can guide your inspection, but appearance alone can’t confirm the cause.
Inspect the roofline and outside walls for possible routes for rainwater to enter. Damaged roof tiles can let water reach the ceiling below, while blocked guttering may spill water against the building. Cracked render can also allow water in. Note whether the mark is near an outside wall, beneath a roof slope or below a gutter.Look for related signs nearby, such as damp patches on an adjoining wall or peeling paint near the ceiling edge. These clues can help narrow down where to investigate. Don’t assume a stain directly below a roof feature proves that feature is faulty: water can travel before it becomes visible indoors.
Consider plumbing if the stain is below a bathroom, kitchen, heating pipe or water system. Faulty plumbing can allow water into the ceiling void and mark the surface below. A leak may leave a local patch, but its position alone can’t identify the pipe or fitting responsible.Compare the mark with the rooms and pipework above it. For example, if the ceiling is below a bathroom, inspect the plumbing in that room. If the patch changes or returns, record its location and appearance. This can help distinguish an ongoing leak from an old mark left after an earlier incident.
Check for rising damp or flooding as possible sources of water ingress. Rising damp can affect lower parts of a building, while flooding can introduce water across several rooms. A ceiling mark may form part of wider damage rather than an isolated decorating problem, especially if walls or nearby ceilings also show damp patches.Walk through the affected area and note every visible mark, including stains on walls and around ceiling edges. One ceiling patch calls for a different investigation from marks across several surfaces. Record only what you can see: where each patch appears and whether the paint is blistering, peeling or discoloured.
Use the stain’s appearance as a reason to investigate, not as a diagnosis. Yellow or brown marks, tide-like edges, blistered paint and peeling finishes can all indicate previous or continuing moisture. A ring may show where water spread and dried, but it can’t tell you whether the source was a roof, pipe or external wall.Check whether the ceiling feels damp, looks swollen or has loose material. Photograph the mark and compare its edges over time; a spreading patch needs attention before painting. Covering it without finding and fixing the source risks the stain returning and leaves the cause unresolved.
How can you tell whether a water stain on a ceiling is dry enough to cover?
Don’t rely on colour alone. Check the ceiling’s condition and moisture before applying primer.
Confirm that the leak has been fixed before assessing whether the ceiling is dry. A fresh mark, spreading edge or new damp patch can indicate continuing water ingress. Painting now risks sealing in moisture, and the stain may return through the finish.After a leak is fixed, drying completely may take 2-4 weeks. The time depends on how much water entered and how deeply the ceiling absorbed it. Keep the area clear for inspection, and don’t treat a faded mark as proof that the ceiling is dry.
Inspect the whole affected area in good light. Look for dark patches, damp-looking edges, blistered paint or a soft surface. Compare the stain with nearby ceiling material. A surface may look dry even while moisture remains beneath the paint or within the plaster.Touch the ceiling gently only if it appears sound. If it feels cool or damp, wait and investigate further rather than priming immediately. Don’t press on sagging plaster or loose material. These signs indicate damage that needs attention before decorating.
Use a moisture meter to assess the surface rather than relying on appearance alone. Before painting a water-stained interior surface, its moisture content should not exceed 12%. Take readings across the stain and around its edges, following the meter’s instructions for the ceiling material.Compare readings from the affected patch with nearby areas that appear dry. A consistently high reading means the ceiling needs more drying or further investigation. Record the readings and locations, particularly in a rental property, so you can compare the same points later.
Before applying primer, make sure the ceiling is clean, dry and free from loose material. If you’ve cleaned the area or treated mould, let it dry fully first. Residual moisture or cleaner can affect adhesion even after the original leak has stopped.Recheck the patch after allowing more time to dry, especially if the stain has a darker centre or the surrounding paint remains raised. Prime only when the surface is dry and the reading is within the stated limit. If water marks return, investigate the source again rather than adding more paint.
If you need practical help assessing water damage before repainting, arrange support from a property repair professional.
We are a trusted property Maintenance company providing reliable, high-quality services across London and Kent: Boiler Installation
We are a trusted property Maintenance company providing reliable, high-quality services across London and Kent. provides property maintenance support for landlords dealing with water damage and follow-on repairs. A ceiling stain is a sign to address the underlying problem before arranging cosmetic work. If a plumbing fault caused the leak, dealing with that issue first helps prevent fresh damage to repaired surfaces.
For landlords, property repairs can address an affected ceiling or nearby finishes once the leak is resolved. Carpenters can help repair damaged timber components. Boiler servicing is also available for landlords managing heating maintenance as part of wider property care.
Contact We are a trusted property Maintenance company providing reliable, high-quality services across London and Kent. to discuss property repairs, or visit www.pps-pm.co.uk.
Move from a ceiling stain to a lasting repair
Base the next step on what caused the damage, not just the mark left behind. If there’s a plumbing leak, arrange the necessary repair before planning the final decoration. Address a fresh or returning stain before it spreads or affects more of the ceiling.
The right approach to covering water stains on a ceiling starts with a sound surface and a blocker suited to the job. If the repair also needs a plumber or wider property maintenance support, Plumbfix 365 can help homeowners and landlords across London and Kent. Clear communication about where the stain appeared and whether it has changed can help focus the next steps.
Contact our trusted London and Kent property maintenance team to discuss the repair and move forward with confidence.
Frequently Asked Questions
What is water ingress?
Water ingress is external water entering a building through a weakness or opening. Rain may pass through damaged roof tiles, for example, or enter through cracked render. Plumbing leaks can also leave marks on ceilings or walls. The visible patch shows where moisture affected the surface, but may not pinpoint where the water entered or travelled.
What tools should I use?
Gather a scraper or brush for loose paint, a damp cloth for surface cleaning and a moisture meter to assess the ceiling. A paint tray and roller help apply the finish; a long-handled roller makes overhead work easier and reduces ladder use. Keep a torch nearby to inspect edges and surface changes. Choose tools to suit the ceiling’s condition, and don’t scrape unstable or sagging material.
Which Stain Blocker to Choose?
Choose a blocker designed to seal water marks and follow its label for the surface and topcoat. Shellac-based Zinsser B-I-N is one option; oil-based blockers offer another. Consider the stain’s severity, application method and drying instructions. Some blockers are clear, while others contain a white opacifier. This affects how the treated patch looks before you apply the finishing paint.
How do you identify and fix the cause of a ceiling water stain before painting?
Note where the stain is, then inspect the room above and nearby exterior features. A patch beneath a bathroom may point to plumbing; one near a roof slope suggests checking the roof. Look for related marks on walls or ceilings. Once you find the source, arrange the relevant repair and watch for fresh staining before decorating.
What steps should you follow to clean and prepare a water-stained ceiling?
After the leak is fixed, scrape or brush away loose paint, working back to a firm edge. Wipe away dust and surface dirt without soaking the ceiling. Treat visible mould with a suitable product, following its label instructions. Let the surface dry, then check for remaining loose material or residue. Primer adheres better to a clean, sound surface.
What is the best stain-blocking primer for water marks on a ceiling in the UK?
There’s no single best blocker for every ceiling: choose one suited to the stain and follow its instructions. Zinsser B-I-N is a shellac-based example, while Zinsser Cover Stain is an oil-based option available in a tin or spray. The stain’s severity and your chosen topcoat can affect the right approach. Apply a small test patch if you want to assess the finish.
Can you use ordinary emulsion paint to cover a water stain, or is stain-blocking paint needed?
Ordinary emulsion alone may not seal a water mark, so it can show through the new finish. Apply a stain blocker first, then paint the ceiling once the blocker is dry. Choose an emulsion intended for ceilings and follow its product instructions. If the mark reappears, don’t keep adding topcoat: check whether moisture remains or the leak is still active.
When should you call a plumber, roofer or electrician about a ceiling water stain?
Call a plumber if the stain relates to pipework, a bathroom or a heating system. Contact a roofer when signs point to damaged tiles or roof entry. If water is near a light fitting or wiring, avoid touching the affected area and seek an electrician’s help. Call 01322 252015 or 01322 251520, or email admin@pps-pm.co.uk.



Comments