


How to Paint Exterior Woodwork and Prepare It for the Weather
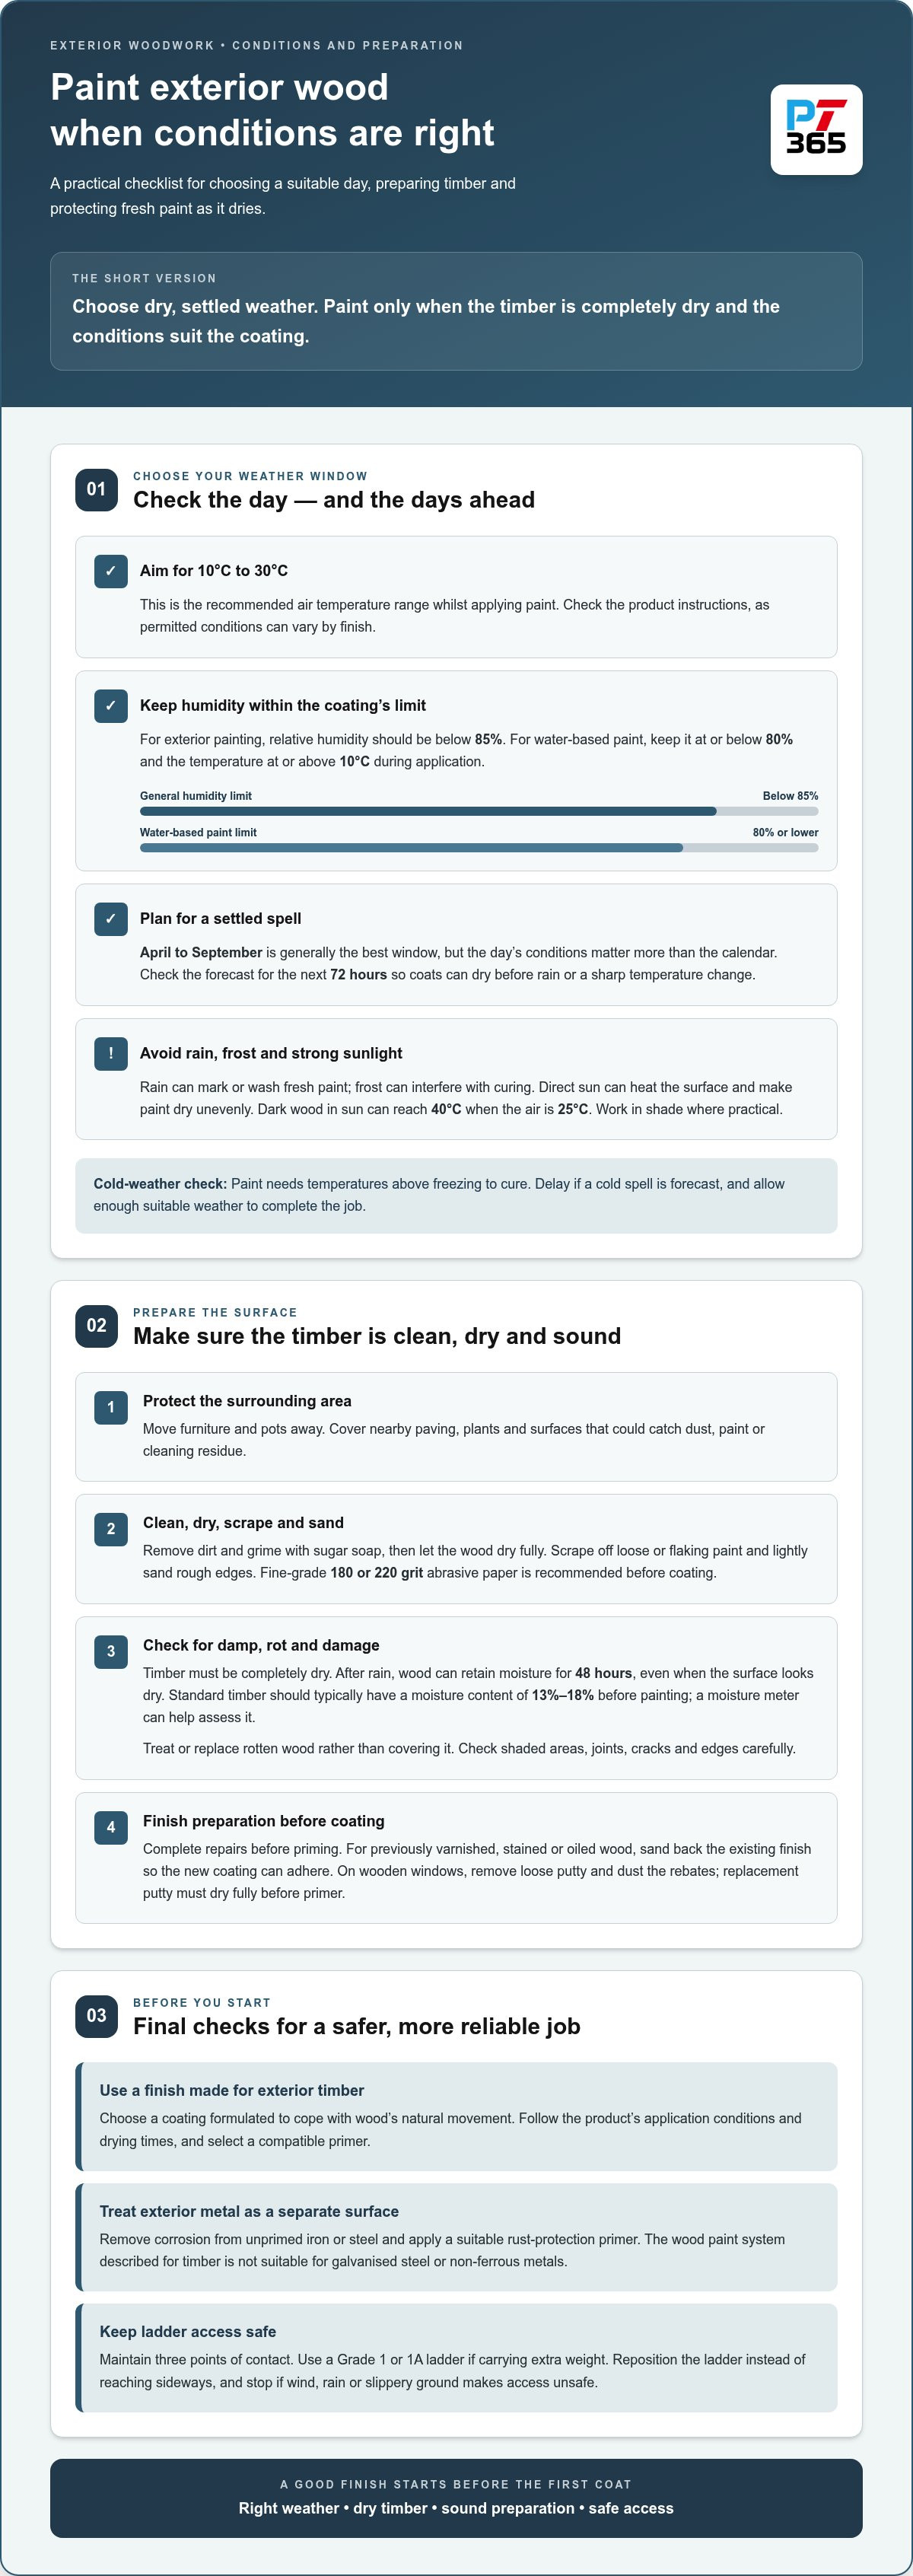
Paint exterior wood in dry, settled weather, when the air temperature is between 10°C and 30°C and relative humidity is below 85%. The timber must be completely dry: after rain, it can hold moisture for 48 hours. Reliable exterior woodwork painting maintenance starts with choosing conditions that let the coating dry properly.
It’s tempting to focus on paint colour or finish, but weather and preparation matter just as much. Rain, frost and strong sunlight can affect drying, while dirt, loose paint or damp timber can undermine the result.
This guide explains when to paint, how to prepare timber and repair cracks and holes, and how to choose between paint, stain and oil. You’ll also learn how to apply coats evenly and protect fresh paint as it dries and cures. Following the right sequence helps you avoid starting when the surface or forecast isn’t suitable.
Table of Contents
When is the best time to paint exterior wood?
For ordinary repainting in the UK, planning permission is generally not needed. Listed buildings, conservation areas and changes that alter a property’s appearance can involve restrictions, so check your local planning authority’s requirements first.
Choose dry, settled weather, with air temperatures between 10°C and 30°C and relative humidity below 85%. For water-based paint, keep humidity at or below 80% and temperature at or above 10º Celsius during application. A sound approach to exterior woodwork painting maintenance starts by matching the day’s conditions to the coating.
Plan for mild months. April to September is generally the best window for exterior painting, but the day’s conditions matter more than the calendar. Paint needs temperatures above freezing to cure. Delay painting if a cold spell is forecast, and allow enough suitable weather to complete the job.
Check the air temperature. Aim for 10°C to 30°C whilst applying paint. Read the product instructions too, because permitted conditions can vary by finish. A warm afternoon alone doesn’t mean the timber is ready. Consider how the temperature may change before the next coat dries.
Let rain-soaked timber dry. Wood can retain moisture for 48 hours after rain, even when its surface looks dry. Wait until it’s completely dry before painting. Trapped moisture can weaken adhesion and contribute to peeling or cracks. Check shaded areas and joints carefully, where dampness may linger.
Avoid rain, frost and strong sun. Rain can mark or wash fresh paint, whilst frost can interfere with curing. Direct sunlight heats the surface and speeds drying unevenly. Dark wood exposed to sun can reach 40°C when the air is 25°C. Work in shade where practical, without painting damp timber.
Check humidity and the forecast. Keep relative humidity below 85%; for water-based paint, don’t apply it above 80%. Check the forecast for the next 72 hours, allowing coats to dry before rain or a sharp temperature change. This planning helps prevent weather disrupting a carefully prepared finish.
Match the finish to exposure. Choose paint made for exterior timber and formulated to cope with wood’s natural movement. Follow the product’s application conditions and drying times. Exterior woodwork painting maintenance works best when the coating suits the exposed surface and the weather. Check the tin before starting, not midway through the job.
Work safely at height. Keep three points of contact on a ladder, and use a Grade 1 or 1A ladder if carrying extra weight. Don’t reach sideways to cover a section; reposition the ladder instead. Stop if wind, rain or slippery ground makes access unsafe.
Cleaning, sanding and preparing exterior surfaces
Prepare in order: protect the surroundings, clean and dry the timber, then remove loose coatings and sand rough areas. Complete repairs before priming so the paint can bond evenly and perform as intended.
Prepare the surroundingsMove garden furniture, pots and other items away before cleaning or sanding. Cover nearby paving, plants and surfaces that could catch dust, paint or cleaning residue. Clear obstructions and keep coverings secure while preparing the timber. This makes the surface easier to reach and helps prevent debris settling on wet paint.
Clean and sand the woodRemove dirt and grime with sugar soap, then let the exterior wood dry fully before sanding. Scrape away loose or flaking paint, and lightly sand rough edges to create a sound surface. Fine-grade 180 or 220 grit abrasive paper is recommended before coating. On previously varnished, stained or oiled wood, sand back the existing finish so the new coating can adhere.
Inspect the timber before coating. Look for soft, rotten or damaged areas and deal with them before painting. Treat or replace rotten wood rather than covering it with a fresh finish. Check cracks, joints and edges closely, since dirt or loose coating can interrupt adhesion. Preparation should leave the surface clean, dry and sound, not merely smooth to the touch.
Check moisture and drying. Wood must be completely dry before painting, especially after washing or wet weather. Standard timber should typically have a moisture content of 13%-18% before painting. A moisture meter can help assess timber that feels dry outside but may still hold moisture within. Allow cleaned surfaces to dry thoroughly, as paint applied too soon can fail to bond properly.
Prepare wooden windows carefully. Remove loose putty and dust the rebates thoroughly before priming. If replacing window putty, let it dry fully before applying primer. Clear dust from corners and joints, where it can collect even after sanding the wider frame. These preparation steps help create a consistent coating around exposed edges.
Prepare exterior metal separately. Remove corrosion from unprimed iron or steel, then apply a suitable rust-protection primer. Don’t assume a wood paint system suits every metal surface: the system described for exterior wood isn’t suitable for galvanised steel or non-ferrous metals. Follow the product instructions for each material. For help with decorating work, explore painters and decorators.
Choosing exterior paint, stain or oil
Choose a finish that suits the appearance you want and the upkeep you can manage. Then select a compatible primer and follow the coating system’s instructions.
Compare paint, stain and oilChoose exterior paint for an opaque colour and consistent finish across timber. Paints designed for outdoor wood are made to be durable, flexible and breathable, supporting natural movement. Stain shows more of the grain, while oil gives timber a treated appearance. Consider how much of the original grain you want visible before choosing a product.Plan for maintenance too. Microporous stains and oils need reapplying every 2-3 years. Oiled wood needs a maintenance coat at least once a year to retain its colour. Clear oil provides some UV resistance, but coloured oil or oil-based stain offers more. Darker oil generally gives more UV resistance than lighter shades.
Choose an eggshell or gloss finishSelect eggshell for a mid-sheen appearance or gloss for a brighter, more reflective surface. For exterior woodwork, use a finish intended for outdoor timber, not an interior coating. An eggshell system generally requires two to three coats instead of an undercoat. Water-based eggshell or gloss needs at least two coats.For a gloss system, apply two undercoats before the gloss topcoat. Oil-based gloss on well-prepared exterior wood is estimated to last 7-10 years; water-based acrylic paint is estimated to last 5-7 years. These estimates help compare systems, but exposure and upkeep also affect how long a finish performs.
Select primer and paintMatch the primer to the timber and finish. Bare or highly absorbent wood can benefit from primer, while new wood needs full priming. On knotty timber, use a knot and resin blocker before painting to help prevent staining through the coating. Check that the primer and topcoat are compatible.Choose the finish after repairs and filling are complete. Exterior filler can create a smooth base over suitable cracks and holes, but it doesn’t replace primer on bare wood. Follow the product’s coverage and drying guidance, and let each coat dry for the recommended time before applying another.
Filling imperfections in exterior wood
Repair defects before applying new coatings. Identify rot first, then fill sound timber, prime exposed areas and maintain the finish.
Rot often leaves timber soft, crumbly or visibly damaged. Cut it out, removing at least 25mm of sound wood around the affected area before replacing it; don’t cover decay with filler or paint.
Check the damage before filling. Gently press suspect areas and inspect joints, end grain and places where water can collect. Soft or crumbling timber may indicate rot, while small, stable cracks or holes may only need exterior filler. If damage extends beyond a local patch, assess the affected wood before choosing a repair.
Remove rot and replace damaged timber. Cut out decayed material and take away at least 25mm of sound wood around it. Replace the damaged section before painting, so the coating sits on a stable base. Filler cannot restore rotten timber or stop decay hidden beneath paint.
Fill sound cracks and holes. Use exterior filler for suitable cracks, holes and open joints in otherwise sound wood. Press it firmly into the defect, then shape it to match the surrounding profile. Follow the product’s drying guidance before sanding. Filler that is still soft can tear or leave an uneven edge.
Sand the repair smooth. Once the filler has dried, sand it level with the surrounding timber. Remove sanding dust before coating, as it can interfere with adhesion and leave a rough finish. Keep repair edges neat, especially on visible window frames and doors.
Prime bare patches and knots. Patch-prime exposed areas before painting, and fully prime new wood. Treat knotty timber with a knot and resin blocker to help prevent stains bleeding through the topcoat. Bare or highly absorbent wood can benefit from a suitable primer. Allow it to dry as directed.
Maintain the coating after repairs. Paint helps shield exterior timber from weather and moisture, but damaged coatings need attention before water reaches the wood. Inspect joinery at least twice a year, ideally in spring and autumn. Touch up small areas promptly, and avoid painting over fresh filler, damp timber or surfaces affected by high humidity.
Bare exterior wood should be primed with Water-Based Wood Primer before painting. Keep this product choice clear when preparing exposed timber: the named primer is for bare exterior wood, and priming comes before the paint. This keeps the preparation step specific, while the repair still follows the sequence of filling, priming and painting.
Drying times and protecting fresh paint
Touch-dry doesn’t mean fully cured. Follow the product’s recoat instructions, then protect the finish while it hardens.
Check the paint’s drying guidance. Water-based acrylic paint typically dries to the touch in 2-4 hours and can be recoated after 4-6 hours. Oil-based gloss takes 16-24 hours between coats. These times vary with conditions, so use the tin’s instructions for the specific product and surface.
Keep coats thin and even. Apply paint along the grain without repeatedly brushing over areas as they begin to dry. Thick or overworked patches can dry unevenly and leave visible marks. Wait the stated interval between coats. Applying the next layer too soon can affect the finish and extend drying.
Allow time for curing. Exterior paint can take 2-4 weeks to fully cure and harden, even after it feels dry. During this period, treat the coating gently. Avoid rubbing, scraping or placing items against painted surfaces, since pressure can mark a finish that has not hardened.
Shield fresh paint from weather. Keep rain, frost and strong sunlight away from the work as far as practical. Rain may mark uncured paint, while direct sunlight can make a surface dry too quickly. Don’t cover wet woodwork with sheeting that touches the coating, as this can smudge the finish.
Take care around doors and windows. Avoid shutting freshly painted windows or doors against their frames. Wet or partly cured paint can stick, tear or leave marks when surfaces separate. Keep the area ventilated and prevent dust, leaves and garden debris from settling on wet coatings.
Inspect before removing protection. Once the final coat feels dry, check edges, joints and exposed sections for drips, marks or missed patches. Don’t rely on a touch-dry appearance to judge full curing. Inspecting after the stated drying period helps you spot defects before the coating hardens.
Plan the work around the curing period. Avoid scheduling cleaning, repairs or other work against freshly painted timber. For exterior decorating support, get help with your property maintenance needs.
If painting or checking an upper section requires a ladder, plan the task before climbing so you can focus on your position rather than reaching for supplies. Painters should maintain three points of contact on a ladder at all times. Keep the brush or other item needed for the next pass within easy reach, and move deliberately. If you cannot reach without leaning away from the ladder, stop and reposition it instead of stretching across wet coating. Position the ladder so it does not touch freshly painted timber or disturb protective coverings.
Before climbing down, consider whether you have completed the section within comfortable reach or need to reposition the ladder. Avoid inspecting from an awkward position. Finish the ladder task safely, then check the coating from a suitable place. Keep tools organised so you are not tempted to reach out of position. If fresh paint is close to the ladder, avoid brushing against it while moving or repositioning equipment. Once the elevated work is complete, leave the painted surface undisturbed and follow the product’s drying guidance.
We are a trusted property Maintenance company providing reliable, high-quality services across London and Kent: Boiler Installation
We are a trusted property Maintenance company providing reliable, high-quality services across London and Kent. For exterior woodwork, its property maintenance and carpentry services can help with repairs that need attention before decorating. This is a practical next step when damaged timber or worn components need more than a fresh coat of paint.
Addressing the underlying woodwork first keeps exterior woodwork painting maintenance focused on the property’s condition. Contact the team to discuss property maintenance or carpentry work.
Make your next exterior painting project easier to manage
Keep a simple record of your exterior woodwork. Note the finish used, repairs completed and areas to inspect later. This gives you a clear starting point for future maintenance, especially if different parts of the property need attention at different times.
Good exterior woodwork painting maintenance also means choosing tasks that suit your skills and access. Small, reachable touch-ups may be manageable as a DIY job. Extensive timber repairs or difficult access can make the work more complex. Property maintenance support can help you plan the next step based on the woodwork’s condition.
For help with property maintenance, contact the team and discuss what your exterior woodwork needs. A practical plan can help you move forward with confidence.
Frequently Asked Questions
How often should you repaint the exterior of a UK home?
Exterior paintwork typically needs repainting every 5-10 years. The right time for your home depends on its exposure and the condition of the coating: sheltered wood may remain sound longer than timber exposed to rain and strong sunlight. Look for peeling, fading or exposed bare patches rather than relying on age alone. Repaint when the protective coating is failing, before moisture damages the wood beneath.
What temperature is too cold to paint outside?
Below 10°C is too cold for applying water-based exterior wood paint. For exterior painting generally, aim for an air temperature between 10°C and 30°C, and keep the temperature above freezing while the paint cures. Check the product instructions, as permitted conditions vary by paint. A cold surface can affect drying even when the air feels mild, so consider the timber's exposure and conditions throughout the job.
How often should exterior woodwork be repainted in the UK?
Plan on repainting exterior woodwork every 5-10 years, then adjust according to its condition. A south-facing sill or exposed door may need attention before sheltered trim, because sunlight and rain affect surfaces differently. Inspect the finish for cracking, peeling and bare spots. If damage is localised, touching up affected areas can help protect the timber, rather than waiting until coating failure spreads across the whole surface.
What paint is best for exterior woodwork in the UK climate?
Choose paint specifically designed for exterior timber. A suitable outdoor coating is formulated to be durable, flexible and breathable, helping it accommodate the wood's natural movement. Select water-based acrylic or oil-based gloss based on the appearance and maintenance routine you prefer, and ensure the primer and topcoat are compatible. For a more natural grain effect, consider exterior stain or oil, noting that these finishes need regular upkeep.
How much does exterior woodwork painting cost in the UK?
The cost of exterior woodwork painting in the UK varies depending on the scale of the property, the amount of preparation required and the condition of the timber. As part of our ongoing commitment to professional exterior woodwork painting maintenance, we provide tailored quotes to suit your specific project. Contact our team for a detailed, transparent estimate for your home.



Comments